基本概念
1.什么是纹理?
更详细的介绍可以看看这篇文章:OpenGL纹理详解
纹理(Texture)可以理解为GPU内代表图像数据的一个对象。
2.原生如何进行纹理渲染
主要是以Android为例简要说明,参考来源:谈一谈Android上的SurfaceTexture
1.SurfaceTexture是什么
SurfaceTexture 是Android上做渲染的核心组件,它是 Surface 和 OpenGL ES纹理的组合,用于提供输出到 GLES 纹理的 Surface。从安卓渲染系统上来说,SurfaceTexture 是一个BufferQueue的消费者,当生产方将新的缓冲区排入队列时,onFrameAvailable() 回调会通知应用。然后,应用调用 updateTexImage(),这会释放先前占有的缓冲区,从队列中获取新缓冲区并执行 EGL 调用,从而使 GLES 可将此缓冲区作为外部纹理使用。
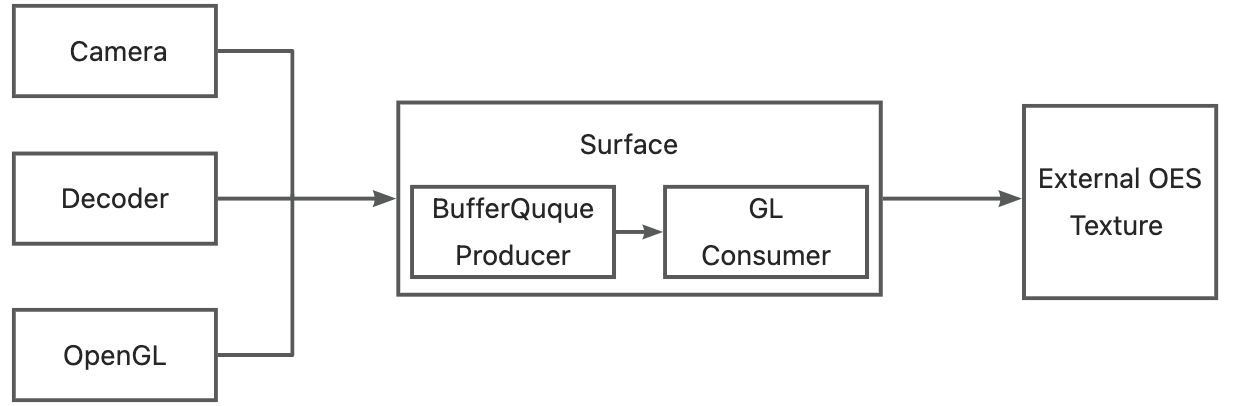
基本流程如下:
1.通过Camera、Decoder、OpenGL生成图像流。
2.图像流通过Surface入队到BufferQueue,并通知到GLConsumer。
3.GLConsumer从BufferQueue获取图像流GraphicBuffer,并转换为EXTERNAL OES纹理。
4.得到OES纹理后,用户方就可以将其转换成普通的纹理,然后应用特效或者上屏。
2.如何共享纹理
假设我们有两个OpenGL的环境,一个是自身的环境称为A,另一个是第三方环境称为B,B想渲染A的纹理,有以下这两种共享形式:
ShareContext(iOS平台的EAGL叫ShareGroup):A共享自己EGLContext给B,但是本身EGLContext是用来管理GL环境的,例如环境下的资源的隔离,共享了EGLContext相当于A把自己的GL环境和资源都共享给B,B当然可以直接访问A的纹理资源了。但是如此对B的侵入较多,破坏了B的环境隔离,很容易对B造成影响,所以存在一定风险,基本所有的GL环境都不会开发接口给外部操作自己的Context,这个方法适用于A与B有大量交互的场景,方便互相使用。
共享内存:一般来说第三方OpenGL环境都会开放SurfaceTexture的接口,通过这个接口我们可以将A的纹理数据共享到B的OpenGL环境中,B可以将其转换成普通的纹理,然后应用特效或者上屏。这个共享在安卓端是通过EGLImageKHR来实现的,当然还有其他方式如HardwareBuffer,而IOS平台使用的是CVPixelBuffer实现。
EGLImageKHR其设计目的就是为了共享2D纹理数据的,因此驱动程序在底层实现的时候,往往实现了CPU与GPU对同一资源的访问,这样就可以做到无需拷贝的数据共享,降低功耗与提高性能。
在Android平台上,了解这点是非常重要的。而iOS平台由于使用了EAGL而不是EGL,因此并不会使用EGLImage,但也有自己的数据映射的方式。
CVPixelBuffer可以用来保存多种格式的图像数据,包括YUV/RGBA等。在CVPixelBuffer的内存管理中,包括了何时释放内存,数据的生命周期等
Flutter共享纹理的实现
1.Flutter渲染框架
下图为Flutter的一个简单的渲染框架

Layer Tree:这个是dart runtime输出的一个树状数据结构,树上的每一个叶子节点,代表了一个界面元素(Button,Image等等)。
Skia:这个是谷歌的一个跨平台渲染框架,从目前IOS和anrdroid来看,SKIA底层最终都是调用OpenGL绘制。Vulkan支持还不太好,Metal还不支持。
Shell:这里的Shell特指平台特性(Platform)的那一部分,包含IOS和Android平台相关的实现,包括EAGLContext管理、上屏的操作以及后面将会重点介绍的外接纹理实现等等。
从图中可以看出,当Runtime完成Layout输出一个Layertree以后,在管线中会遍历Layertree的每一个叶子节点,每一个叶子节点最终会调用Skia引擎完成界面元素的绘制,在遍历完成后,在调用glPresentRenderBuffer(IOS)或者glSwapBuffer(Android)按完成上屏操作。
基于这个基本原理,Flutter在Native和Flutter Engine上实现了UI的隔离,书写UI代码时不用再关心平台实现从而实现了跨平台。
Flutter在设计的时候考虑到了高性能的纹理渲染,所以设计了TextureLayer(上图橙色框),和其他的FlutterLayer不一样,这个是用来专门渲染外接纹理的,当在Flutter里创建出一个Texture控件时,代表的是在这个控件上显示的数据,需要由Native提供。
2.Flutter共享纹理流程
我们已经知道,可以通过TextureLayer来实现纹理共享,那么在实际开发中,该怎么实现呢?
共享纹理三步走:
原生端创建一个对象,实现FlutterTexture协议,该对象用来管理具体的纹理数据
原生端通过FlutterTextureRegistry来注册第一步的FlutterTexture对象,获取一个flutter纹理id
原生端将该id通过channel机制传递给dart侧,dart侧就能够通过Texture这个widget来使用纹理了
1 | //自己创建texture注册 val surfaceTexture = MySurfaceTexture val surfaceTextureEntry = binding.textureRegistry.registerSurfaceTexture() //使用flutter提供的方法快捷创建 val surfaceTextureEntry = binding.textureRegistry.createSurfaceTexture() //获取id返回dart端 val id = surfaceTextureEntry.id().toInt() |
Flutter共享纹理的源码探究
原生注册纹理的起点:FlutterPluginBinding.textureRegistry.createSurfaceTexture()
1 | /** * Creates and returns a new {@link SurfaceTexture} managed by the Flutter engine that is also * made available to Flutter code. */ @Override public SurfaceTextureEntry createSurfaceTexture() { Log.v(TAG, "Creating a SurfaceTexture."); final SurfaceTexture surfaceTexture = new SurfaceTexture(0); return registerSurfaceTexture(surfaceTexture); } |
以下是JNI层的代码追踪
1 | static void RegisterTexture(JNIEnv* env, jobject jcaller, jlong shell\_holder, jlong texture\_id, jobject surface\_texture) { ANDROID\_SHELL\_HOLDER->GetPlatformView()->RegisterExternalTexture( static\_cast<int64\_t>(texture\_id), // fml::jni::ScopedJavaGlobalRef<jobject>(env, surface_texture) // ); } |
以上源码地址:platform_view_android_jni_impl.cc
1 | void PlatformViewAndroid::RegisterExternalTexture( int64\_t texture\_id, const fml::jni::ScopedJavaGlobalRef<jobject>& surface\_texture) { if (android\_context_->RenderingApi() == AndroidRenderingAPI::kOpenGLES) { RegisterTexture(std::make\_shared<AndroidExternalTextureGL>( texture\_id, surface\_texture, jni\_facade_)); } else { FML_LOG(INFO) << "Attempted to use a GL texture in a non GL context."; } } |
以上源码地址:platform_view_android.cc
1 | void TextureRegistry::RegisterTexture(const std::shared\_ptr<Texture>& texture) { if (!texture) { return; } mapping\_\[texture->Id()\] = texture; } |
以上源码地址:texture.cc
这里额外放出一个方法,是用于从mapping中获取已经注册的纹理。
1 | std::shared\_ptr<Texture> TextureRegistry::GetTexture(int64\_t id) { auto it = mapping_.find(id); return it != mapping_.end() ? it->second : nullptr; } |
mapping_end(): 返回的是 ‘end element’是跟在Map中最后一个元素之后的理论元素。
mapping_.erase() 擦除匹配 element,类似与其他语言的remove。
以上源码地址:texture.cc
1 | void TextureRegistry::UnregisterTexture(int64\_t id) { auto found = mapping\_.find(id); if (found == mapping_.end()) { return; } found->second->OnTextureUnregistered(); mapping_.erase(found); } |
以上源码地址:texture.cc
至此,我们在各原生端(Android)的注册已经完成,那我把场景切回flutter端,视线转移到textureLayer渲染中。
省略掉不重要一些过程,主要Flutter界面使用Texture Widget的过程,最终是通过TextureLayer来进行纹理渲染。
Flutter渲染机制:Flutter渲染机制—GPU线程
1 | @override void addToScene(ui.SceneBuilder builder) { builder.addTexture( textureId, offset: rect.topLeft, width: rect.width, height: rect.height, freeze: freeze, filterQuality: filterQuality, ); } |
这里又遇到JNI的方法,尝试继续往下追一下
1 | void SceneBuilder::addTexture(double dx, double dy, double width, double height, int64\_t textureId, bool freeze, int filterQualityIndex) { auto sampling = ImageFilter::SamplingFromIndex(filterQualityIndex); auto layer = std::make\_unique<flutter::TextureLayer>( SkPoint::Make(dx, dy), SkSize::Make(width, height), textureId, freeze, sampling); AddLayer(std::move(layer)); } |
以上源码地址:scene_builder.cc
到最后只知道Flutter把这个layer入栈了,目前不知道入栈最后具体作用,从部分源码注释,应该是这里存储着渲染层级。然后scene最终渲染,其实是要经过FlutterView.render放法继续往下走。本次分享共享纹理过程,Flutter的渲染过程暂时忽略。
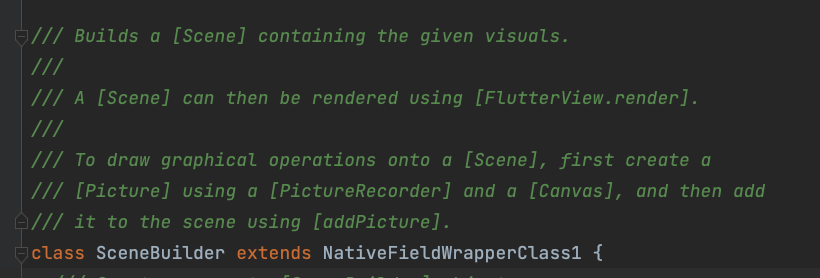
但是从这里我们应该能推测,这里应该是和引擎建立纹理关联,渲染的时候会拿出对应的layer来执行对应的渲染方法
然后从前渲染流程图得知,最终应该会走到print方法,回顾下图:
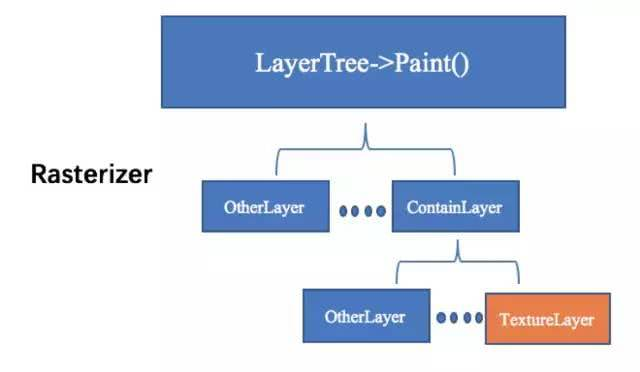
所以我们直接查阅TextureLayer的print方法,看看是否能和之前的步奏关联起来
1 | void TextureLayer::Paint(PaintContext& context) const { FML\_DCHECK(needs\_painting(context)); std::shared\_ptr<Texture> texture = context.texture\_registry ? context.texture\_registry->GetTexture(texture\_id_) : nullptr; if (!texture) { TRACE\_EVENT\_INSTANT0("flutter", "null texture"); return; } SkPaint sk\_paint; DlPaint dl\_paint; Texture::PaintContext ctx{ .canvas = context.canvas, .builder = context.builder, .gr\_context = context.gr\_context, .aiks\_context = context.aiks\_context, .sk\_paint = context.state\_stack.fill(sk\_paint), .dl\_paint = context.state\_stack.fill(dl\_paint), }; texture->Paint(ctx, paint\_bounds(), freeze\_, ToSk(sampling_)); } |
以上源码地址:texture_layer.cc
在这里看到了最终纹理的来源就是我们在原生端注册的纹理,从mapping里面获取的,然后执行了texture->Paint方法最终渲染到界面上。
其实IOS的整体流程也差不多,可能会存在纹理操作的差异而已。因为本次是以Android端作为例子的,所以这里的纹理是来自于AndroidExternalTextureGL,最终渲染如下:
1 | void AndroidExternalTextureGL::Paint(PaintContext& context, const SkRect& bounds, bool freeze, const SkSamplingOptions& sampling) { if (state_ == AttachmentState::detached) { return; } if (state_ == AttachmentState::uninitialized) { glGenTextures(1, &texture\_name\_); Attach(static\_cast<jint>(texture\_name_)); state_ = AttachmentState::attached; } if (!freeze && new\_frame\_ready_) { Update(); new\_frame\_ready_ = false; } GrGLTextureInfo textureInfo = {GL\_TEXTURE\_EXTERNAL\_OES, texture\_name_, GL\_RGBA8\_OES}; GrBackendTexture backendTexture(1, 1, GrMipMapped::kNo, textureInfo); sk\_sp<SkImage> image = SkImage::MakeFromTexture( context.gr\_context, backendTexture, kTopLeft\_GrSurfaceOrigin, kRGBA\_8888\_SkColorType, kPremul\_SkAlphaType, nullptr); if (image) { SkAutoCanvasRestore autoRestore(context.canvas, true); // The incoming texture is vertically flipped, so we flip it // back. OpenGL's coordinate system has Positive Y equivalent to up, while // Skia's coordinate system has Negative Y equvalent to up. context.canvas->translate(bounds.x(), bounds.y() + bounds.height()); context.canvas->scale(bounds.width(), -bounds.height()); if (!transform.isIdentity()) { sk\_sp<SkShader> shader = image->makeShader( SkTileMode::kRepeat, SkTileMode::kRepeat, sampling, transform); SkPaint paintWithShader; if (context.sk\_paint) { paintWithShader = *context.sk\_paint; } paintWithShader.setShader(shader); context.canvas->drawRect(SkRect::MakeWH(1, 1), paintWithShader); } else { context.canvas->drawImage(image, 0, 0, sampling, context.sk\_paint); } } } |
以上源码地址:android_external_texture_gl.cc
为了方便对比差异,附上IOS最终渲染过程
1 | void IOSExternalTextureMetal::Paint(PaintContext& context, const SkRect& bounds, bool freeze, const SkSamplingOptions& sampling) { \[darwin\_external\_texture\_metal\_ paintContext:context bounds:bounds freeze:freeze sampling:sampling\]; } |
由于IOS嵌套调用较多,因此详细过程可直接查阅源码:
Paint源码:ios_external_texture_metal.mm
paintContext源码:FlutterDarwinExternalTextureMetal.mm
IOS之前版本的渲染:
1 | void IOSExternalTextureGL::Paint(SkCanvas& canvas, const SkRect& bounds) { if (!cache\_ref\_) { CVOpenGLESTextureCacheRef cache; CVReturn err = CVOpenGLESTextureCacheCreate(kCFAllocatorDefault, NULL, \[EAGLContext currentContext\], NULL, &cache); if (err == noErr) { cache\_ref\_.Reset(cache); } else { FXL\_LOG(WARNING) << "Failed to create GLES texture cache: " << err; return; } } fml::CFRef<CVPixelBufferRef> bufferRef; bufferRef.Reset(\[external\_texture_ copyPixelBuffer\]); if (bufferRef != nullptr) { CVOpenGLESTextureRef texture; CVReturn err = CVOpenGLESTextureCacheCreateTextureFromImage( kCFAllocatorDefault, cache\_ref\_, bufferRef, nullptr, GL\_TEXTURE\_2D, GL\_RGBA, static\_cast<int>(CVPixelBufferGetWidth(bufferRef)), static\_cast<int>(CVPixelBufferGetHeight(bufferRef)), GL\_BGRA, GL\_UNSIGNED\_BYTE, 0,&texture); texture\_ref\_.Reset(texture); if (err != noErr) { FXL\_LOG(WARNING) << "Could not create texture from pixel buffer: " << err; return; } } if (!texture\_ref_) { return; } GrGLTextureInfo textureInfo = {CVOpenGLESTextureGetTarget(texture\_ref\_),CVOpenGLESTextureGetName(texture\_ref\_), GL\_RGBA8\_OES}; GrBackendTexture backendTexture(bounds.width(), bounds.height(), GrMipMapped::kNo, textureInfo); sk\_sp<SkImage> image =SkImage::MakeFromTexture(canvas.getGrContext(), backendTexture, kTopLeft\_GrSurfaceOrigin,kRGBA\_8888\_SkColorType, kPremul_SkAlphaType, nullptr); if (image) { canvas.drawImage(image, bounds.x(), bounds.y()); } } |
可以得出大致的最终渲染过程:
Flutter gl创建Texture
Attach,绑定GLcontext
更新纹理使用,标识即将渲染下一帧
准备下一帧数据(从原生纹理复制过来),生成SkImage
将SkImage渲染到给定的canvas上(由Skia上屏)
那么总体的共享流程用图表示大概是这样的:

Flutter共享纹理使用场景
1.原生独有的渲染器渲染的纹理需要共享到dart –如PDF渲染
2.原生渲染性能远大于dart –如视频播放
3.硬件交互限制,必须由原生渲染 –录像
4.dart想使用某些三方渲染引擎处理纹理